Congratulations you are now 80% through the finishes of your new kitchen design. The final component is the kitchen splashback and is used to tie everything together and form a backdrop to highlight your focal point or create that feature to bring the area to life.
You may have something in mind but keeping your colour, texture, style and installation schedule into consideration will impact the final concept.
Tiles:
The process of manufacturing tiles has evolved over the centuries. Modern tiles are now manufactured on a biscuit base where a coating is painted, sealed, cured and/or polished. This means the tile face is durable and the base is more porous to allow easy adhesion to a surface and can also be decorated in a huge variety of methods. The texture, colour and shape of the tile is a unique blend of components to create character while maintaining product longevity. Materials used to create tiles range from ceramics, porcelain and glass products. As the characteristics of these products differ, the installation method and materials used can also differ. On site, minor preparation is required to ensure that the adhesive is level and the grout lines are uniform. To achieve the best results, walls and surface materials are required to be straight and free from defects. This will become more apparent in the installation of large scale tiles, where the surface does need to be level and straight to reduce the risk of cracking.
The installation of a tiled splashback can usually be completed in 1 day. Once the benchtop has been installed, the tiles adhere to the wall between the benchtop and the upper cabinetry. The height of your splashback is usually determined by the installation specifications of your cooktop and/or rangehood. Keeping in mind, we do recommend a minimum 600mmH for Electric/Induction and minimum 650mmH for Gas.
Benefits:
- Huge number of colours and finishes available
- Durable
- Limited time without a functioning kitchen
Limitations:
- Cleaning of grout can be more difficult due to its porosity
Glass:
Can be Installed as a splashback or window between the benchtop and upper cabinetry and used to reflect light and provide the illusion of additional space.
Once your benchtop has been installed a final measure of the space will be completed. Prior to this appointment, it is imperative that the walls are flat, square and free from defects ready for the glass install. The glazier will use the measurements determined on site to cut down your glass panel and any additional notches or cuts where required (eg. powerpoints, windows, joins).
In order to install the glass behind a cooktop, it is required to be toughened. This is a curing process used to decrease the effects of heat on the structure of the glass. Once this process is complete no changes can be made to the measurements or cut outs to the glass so it is important to provide these details to the glazier during your check measure appointment.
The back of the glass is then painted to the desired colour. There is a huge amount of glass splashback colours available and colour match is also available in this product. Keeping in mind there are two types of glass, clear glass does show a green undertone due to the properties of the glass so a low iron substitute has been developed to reduce this effect and show a true colour match. For a modern look, a mirror splashback is another option worth considering in your kitchen remodel.
Once your glass has been manufactured an installation date will be confirmed where the glass is fitted. During this appointment the glass will be adhered to the wall and sealed around the perimeter, ready for the connection of electricals. This process can take between 7-10 business days.
Benefits:
- A huge number of colours available
- Easy to clean
- Seamless finish
Limitations:
- High gloss product requires constant cleaning
- Extended timeline for installation
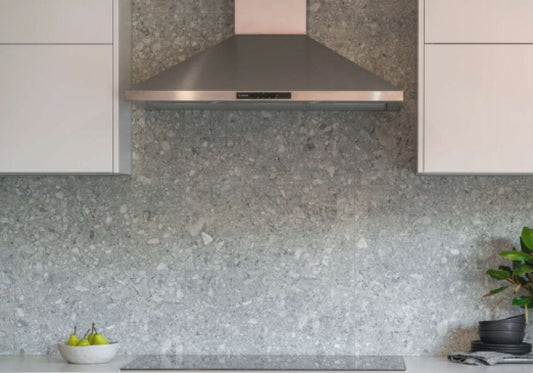
Stone:
As part of your benchtop install, the slab can be continued up the wall to form a stone splashback. The process, much like stone benchtops will be completed after the cabinetry is installed allowing the beautiful marble splashback to continue up the wall.
As the stone is a combustible material it will need a 200mm clearance between a gas burner and the stone surface and in many cases will require the cabinet depth to be increased to accommodate.
Benefits:
- Hardwearing and durable
- Water and scratch resistant
- Installed at the same time as the benchtop
Limitations:
- Specialised cleaners required for stubborn stains
- Property entry requirements restrict slab sizing